---
title: Upgrade SSD
h1: Upgrade SSD on Laptop
description: I need to upgrade my laptop''s SSD. How do I backup my drive? How do I replace the hardware? This post answers these questions and more.
author: JWRR
date: February 23, 2019
theme: a
...
[View Markdown](index.md)
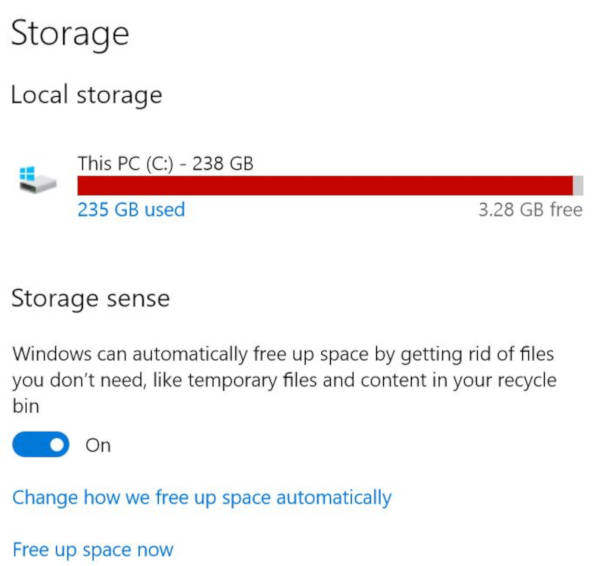
It looks like I need to upgrade my laptop''s SSD. How do I backup my drive? How do I replace
the hardware? This post tries to answers these questions.
I'm running Windows 10 on a
[Dell XPS 13, model 9343](https://www.notebookcheck.net/Dell-XPS-13-9343-Touchscreen-Ultrabook-Review.135817.0.html).
I''m going to upgraded the SSD from 256GB to 1TB. I don''t want to use third
party software. For better or worse, I''m going to use Window's built-in
utilities such as Backup and Restore. I don''t know what I'm doing but I''ll
figure it out as I go. Wish me luck.
{{ toc }}
##@ Ingredients
* [External USB Portable Hard Drive](https://www.newegg.com/Product/ProductList.aspx?Submit=ENE&N=100167526&IsNodeId=1&Description=usb%20external%20drive) -
I''ll use an old Seagate 1TB drive drive that I already have. A new 2TB
external drive costs ~$70.00.
* [External USB DVD Writer](https://www.newegg.com/Product/ProductList.aspx?Submit=ENE&N=100167526&IsNodeId=1&Description=usb%20external%20drive) -
This is needed as a work-around to a [Windows limitation](#create-rescue-disk).
I have an old one. A new DVD writer costs ~50.00.
* [Tools](https://www.newegg.com/Product/Product.aspx?Item=04S-00AM-00001) -
T5 Torx Screwdriver and a small Phillips #0 Screwdriver. The tool set cost me ~15.00.
* New SSD Drive - [See below](#which-ssd). My 1TB SSD cost ~150.00.
* Total Cost - From ~$150.00 to about ~$300.00, depending on how much stuff you already have.
## IFIXIT Teardown (teardown)
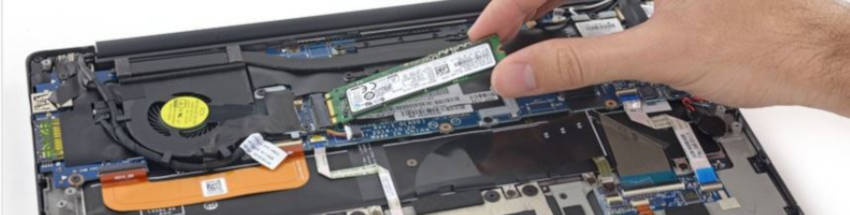
Here''s a link to the [IFIXIT Teardown of the XPS 13](https://www.ifixit.com/Teardown/Dell+XPS+13+Teardown/36157).
Watch it and then ask "Do we really want/need to do this?" It will void the
warantee, which has already expired. I have 2GB of free space, so yeah... I need to do this.
##@ mSATA vs M.2 SATA vs M.2 NVMe (which-ssd)
Your laptop may support mSATA, M.2 SATA or M.2 NVMe. None of these are
interchangable, so please read the laptop documentation.
[Crucial has an SSD selector page](https://www.crucial.com)
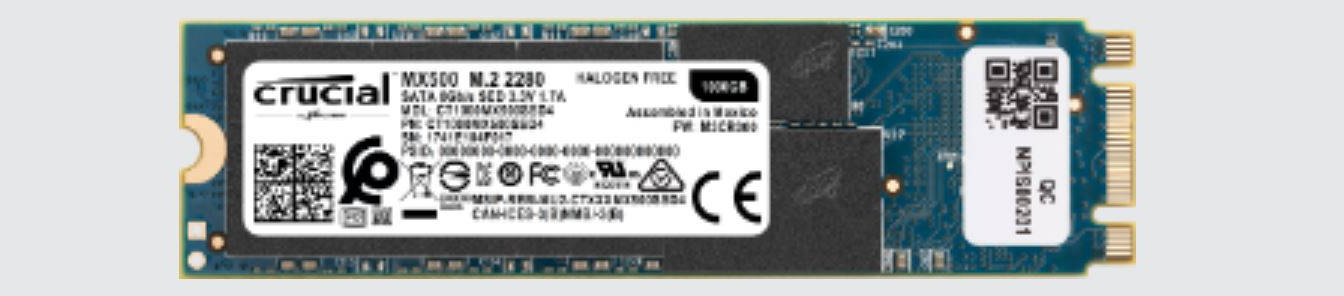
that can help pick the correct SSD. My Dell XPS 13 (9343) uses an M.2 SATA
so I bought the
[Crucial MX500 1TB 3D NAND M.2 Type 2280 Internal SSD](https://www.newegg.com/Product/ProductList.aspx?Submit=ENE&DEPA=0&Order=BESTMATCH&Description=Crucial+MX500+1TB+M.2+SATA+2280+SSD)
for ~$150.00.
### M.2 Notes (m2-notes)
* The M.2 Form Factor was initially called the Next Generation Form Factor
(NGFF), but how long can you call it *next generation*, before
it becomes the *current generation* or *last generation*?
* M.2 cards come in three different sizes. The smallest is 2242 (22mm x 42mm),
the mid-size is 2260 (22mm x 60mm) and the largest is 2280 (22mm x 80mm). As
shown in the above picture, my laptop can use the largest card (2280).
* M.2 cards are keyed or notched to prevent them from being plugged into an
incompatible socket. The M.2 Form Factor defines 12 key positions labelled A
through M (the letter I is skipped). An M.2 SATA card, which I need, has two
keys (or notches). The 1^st^ key is at position B (six pins from the bottom in
the above picture) and the 2^nd^ key is at position M (5 pins from the top).
This is referred to a **B+M Keyed** and can work in a **B** socket
or **M** socket. Newer XPS 13 laptops support the faster M.2 NVMe SSD which
are **B-Keyed**.
## Create a Recovery USB Drive (create-recovery-drive)
Windows makes it easy to create a bootable USB Flash Drive. Connect the USB
drive, type `recovery` in the Windowssearch box and then double-click on the Control
Panel''s **recovery** app and then follow the prompts.

##@ Create Backup Image of C Drive
It's easy to create a backup image of your C drive using Windows Backup and
Restore. Connect the external USB Hard Disk Drive and Navigate to **Settings ->
Update & Security -> Backup**. Click on **Go to Backup and Restore (Windows
7)** and click on **Create System Image**, select your USB External Hard Disk
and then click-through.

## Create Rescue Disk [skip this] (create-rescue-disk)
The Backup Image is **NOT** bootable. A separate bootable, rescue disk needs
to be created. It's easy to burn a rescue disk to a DVD, but now for some
bad news. Windows can only create a Bootable Rescue Disc on a DVD. Windows
can''t create a Rescue Disc directly onto an external USB Hard Drive. The
work-around is shown below.

Here is the work-around to make a bootable USB flash drive.
* [Create Bootable Rescue DVD](#create-dvd)
* [Shrink the partition on the external USB Drive](#shrink-partition)
* [Create a new partition on the HDD](#create-partition)
* [Make the new partition active, which means bootable](#make-bootable)
* [Copy all the files from the Bootable Rescue DVD to the new, active partition](#copy-repair)
### Create System Repair DVD [skip this] (create-dvd)
Connect the USB DVD writer and navigate to **Settings -> Update & Security ->
Backup**. Click on **Go to Backup and Restore (Windows 7)** and click
on **Create system repair disc** and click-through.
### Shrink Partition on USB Drive [skip this] (shrink-partition)
The **Disk Management** program allows you to create, delete and modify
partitions and volumes. You need **Admin** access to run **Disk Management**.
If you're running in an Admin account then Open **File Explorer**, right-click
on **This PC**, and then click on **Manager**.
#### Start Powershell [skip this]
If you're running in a standard user account I commend you, but I only know how
to to run **Disk Management** from the **Powershell**. Type **powershell**
into the start search box, right-click on the **powershell** icon, and click
**Run as adminstrator**. At the **powershell** prompt type `compmgmt.msc`.

In the **Computer Management** window click on **Disk Management**. Right-click
on the partition you want to shrink (it should be the only partition on the
USB Hard Drive), and the click **Shrink volume...**.
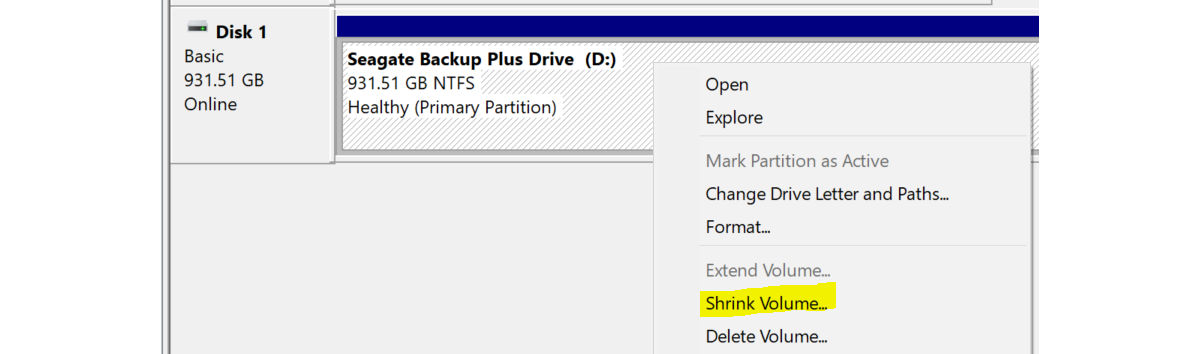
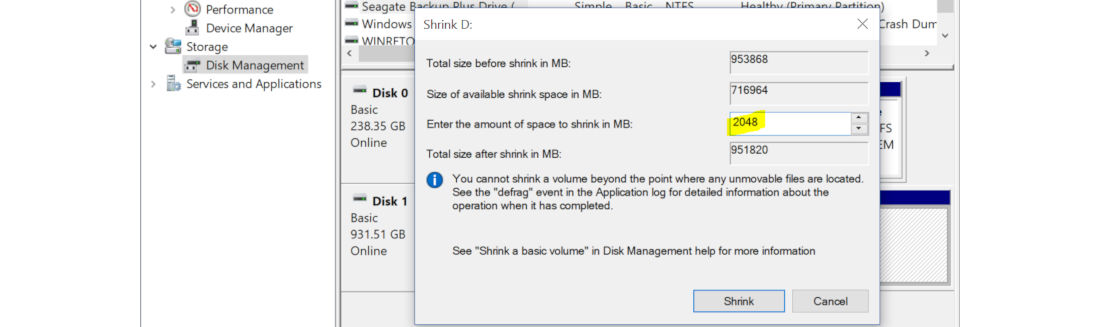
I want to shrink the volume by 2GB. 1GB should be enough for a Recovery Disk,
plus another 1GB for good measure. Typed `2048` in the **Enter the amount
of space to shrink** field and click `Shrink`.
### Create Partition on USB Drive [skip this] (create-partition)
We now have 2 GBytes of unallocated space on the external drive. The
next few steps will allocate and format the space and make it bootable.
Right-click on the unallocated space, select **New simple volume**, make sure
the type is **NTFS**, and click-through.

### Make Partition Bootable [skip this] (make-bootable)
This step makes the new partition bootable. Right-click on the partition
and see if you can make the partition **active**. If not then
open **powershell** and type `diskpart`. At the **DISKPART>** prompt
enter the following.
```
list disk
select disk 1
list partition
select partition 2 (pick the partition that is about 2GB (2048MB) )
active
exit
```
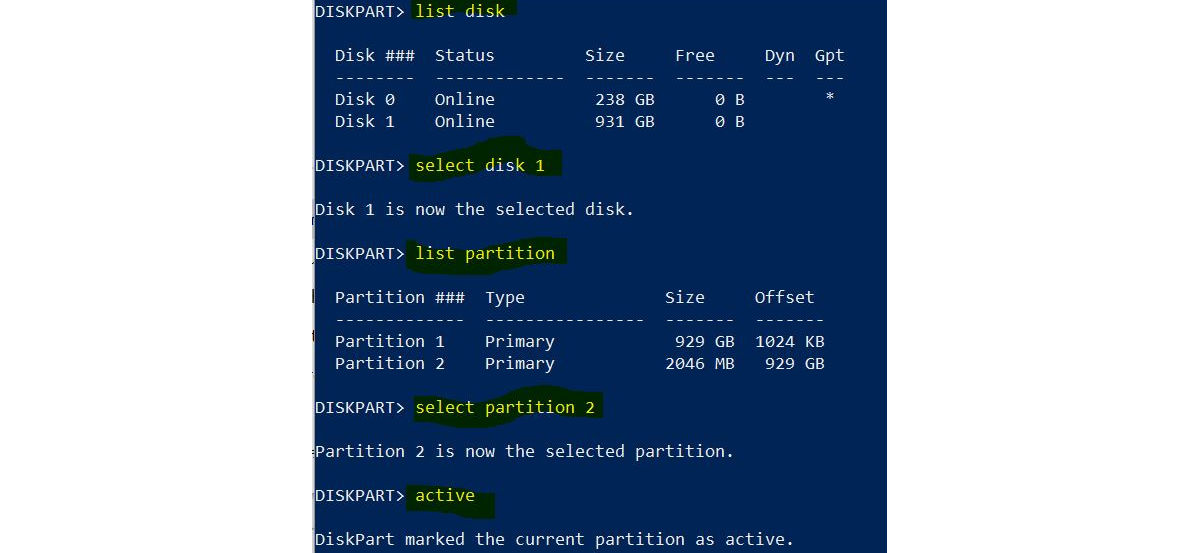
The external HDD''s new partition should now be active and bootable.
The following **diskpart** commands remove all contents from the flash drive,
create a new partition and make it bootable (active).
```
diskpart
list disk
select disk 1
list partition
clean (WARNING: This deletes everything from drive. There are no "are you sure?" prompts)
list partition
create partition primary
list partition
select partition 1
format fs=fat32 label="Rescue Disk" quick
active
exit
```
Pro Tip: You can use 3-letter shortcuts in diskpart. For example, instead of
typing `select partition 1` you can type `sel par 1`. Here''s how to format a
bootable partition [Like a Boss](https://www.youtube.com/watch?v=NisCkxU544c).
```
diskpart
lis dis
sel dis 1
lis par
cle (NO WARNING NEEDED. YOU''RE A BOSS)
lis par
cre par pri
lis par
sel par 1
for fs=fat32 label=Win10Rescue quick
act
exi
```
#### File Format Notes (file-formats)
* File Systems - **TL;DR: Use FAT32**. Windows supports four file system
types. FAT (or FAT16) supports drives up to 4GBytes. FAT32 supports drives
up to 2TBytes (2000 GBytes) and files up to 4GBytes. exFAT is the newest and
supports huge files and drives. NTFS is a journaling file system, that helps
recover from a crash or power loss, and is typically used for internal drives
but not so much for USB drives. My BIOS can boot from **FAT32** and **NTFS**.
* Quick vs Full - **TL;DR: Use Quick**. The Full format is slow
because it checks for bad sectors by writing and reading every location. The
Full is useful for wiping the USB drive, but it takes a while.
* Label Length - The label must be less than 12 Characters for FAT
(FAT16, FAT32 and exFAT). NTFS supports longer labels.
### Copy System Repair DVD to Bootable Partion [skip this] (copy-repair)
Open the **File Explorer**, navigate to the DVD player and select
all of the files and folders (I use `Ctrl+A` to **select all** and `Ctrl+C`
to put the files and folders into the copy buffer). Then navigate to the
new partition on the external Hard Disk Drive and paste the files (I
use `Ctrl+V`). The new partition now contains the Rescue Disc and is ready
to be booted.
## Change Boot Order (change-boot-order)
The laptop has a boot order that is contained in the BIOS. This order needs
to be changed to boot from the external Drive. Disconnect the DVD player but
leave the USB drive connected.
To edit the BIOS reboot the laptop and repeatedly press `F2` (once a second
should be fast enough). The BIOS window should open showing the boot order.
Navigate to the Boot Order field. You should see the USB drive in the list.
Select it and use the arrow to move it to the top of the list. Make the USB
Drive the first entry.
Exit the BIOS screen. The laptop should boot from the USB drive and display
the Recovery screen.
## Restore the Backup Image (restore-image)
The laptop should have booted from the USB drive.
Select **Troubleshoot -> System Image Recovery -> Windows 10**. The Recovery
program will search for any backup images. We're going to stop here but
the next step would be to select the most recent backup image and the
restore should begin and the backup image is written to the C-drive.
## Remove the Back Cover (remove-cover)
My back cover of my laptop is mounted with eight Torx screws.
## Remove the SSD (remove-ssd)
## Install the SSD (install-ssd)
## Replace the Back Cover (replace-cover)
## Done (done)